The first chapter of this guide ended on the "Let's Get You Verified" screen. This one begins there — because that screen does not end registration, it continues it.
Identity verification on Binance is not an optional extra for people who want higher limits. The exchange has required it from every new account since August 2021, and the rule still stands. Until the check is passed you have an account but no exchange inside it: you cannot fund it, there is nothing to trade, and P2P is closed.
The good news is that the whole process takes about ten minutes if you prepare. The bad news is that confirmed details cannot be changed afterwards, and haste costs more here than in any other chapter.
What does not work without verification
An unverified account is not "some features unavailable". It is an account that is switched off almost entirely.
| Works | Does not work |
|---|---|
| Withdrawing funds, if any ended up on the account | Funding the account — with crypto or with money |
| Cancelling orders you already placed | Trading: spot, futures, conversion |
| Closing open positions | P2P — buying and selling for cash and transfers |
| Viewing the interface | Practically everything else the exchange does |
The exchange's logic is simple: anything that lets you bring money onto the platform or act on it requires a known customer. Anything that lets you take what is yours and leave stays available.
Hence the practical conclusion: do not move money onto the account before verification is done. Not because it will fail, but because you will end up with a funded account you cannot do anything with.
What to prepare
- A document that has not expired. An expired passport is the most common rejection reason, and the most annoying: the review takes time and the outcome is known in advance.
- A spot with even light. Not backlight from a window, not a yellow lamp in the corner. Daylight by a window works, as long as the window is behind the camera rather than behind you.
- Your phone, if you verify from it. The process is noticeably easier in the mobile app: the document can be scanned with the camera instead of uploading a file you photographed earlier.
- The document's details at hand. You will have to type them in and then check them.
Take off your glasses and any headwear in advance — they will not pass anyway, and it is better to learn that now than after the review.
Step 1. Country and document type
The first screen is the one the registration chapter ended on.
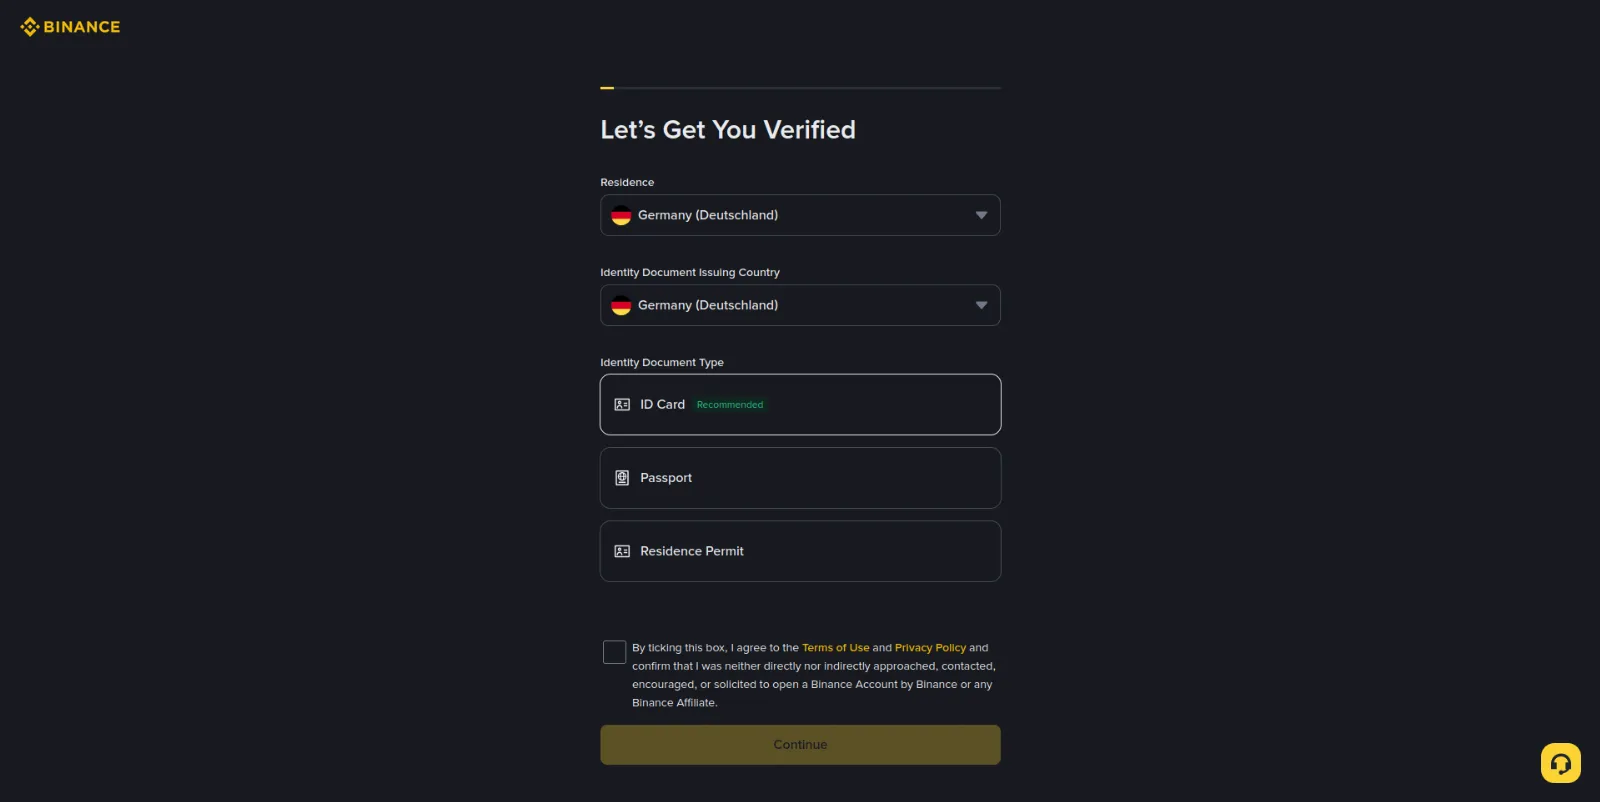
Three fields:
| Field | What to choose |
|---|---|
| Residence | The country where you live |
| Identity Document Issuing Country | The country that issued your document |
| Identity Document Type | The type: ID card, passport, residence permit |
The list of document types depends on the issuing country. The screenshot above has Germany selected, where ID Card, Passport and Residence Permit are offered and the ID card is marked as recommended. Your country may show a different set — shorter, or with different names. That is normal and does not mean something went wrong: the exchange shows what it is able to verify for that particular country.
Your country of residence and your document's country may differ — the form allows it.
Below is the terms checkbox. Until it is ticked, the Continue button stays inactive.
Choose your country of residence honestly. This is not a formality and not a field you can correct later: it determines which products are available to you, what your limits are, and which legal entity of the exchange serves you. In some countries Binance operates through a separate licensed company with its own, noticeably smaller limits. A country picked at random leads either to a rejection or to an account you cannot use the way you expected.
Step 2. The document photo
Next comes the document itself — both sides, if it is a card. The screen shows the photo requirements and the frame the document has to fit into.
The requirements are worth reading before you shoot, not after a rejection:
- The whole document in frame, all four corners visible. A cropped corner is grounds for rejection.
- The text is readable. Not "legible overall" but actually readable: series, number, date, name.
- No glare. The main enemy is a flash or a lamp directly above the document. A laminated page reflects light exactly onto the part that matters most.
- A plain background, document not in your hands. Put it on a table and shoot from above.
- No edits. Do not crop, do not adjust brightness, do not use filters or the gallery's "enhance". The exchange sees a processed photo and rejects it.
If you verify through the mobile app, the document is scanned by the camera during the process — more reliable than uploading something shot earlier, because the app itself will tell you the document missed the frame or the shot is blurred.
Step 3. The liveness check
Next the exchange checks that the document was brought by its owner and not by someone who found a stranger's passport. This is not just a selfie: the camera asks you to perform a few simple actions to tell a living person from a photograph held up to the lens.
The official requirements are short, and all of them are about one thing — your face must be visible:
- No headwear. Hat, cap, hood — all of it comes off.
- No glasses. Including clear ones: a reflection on the lens hides an eye.
- No filters. No smoothing, no enhancement — the camera has to record what is actually there.
- Enough light. The face lit evenly, without deep shadow on one side.
- The whole face, centred in frame, eyes open.
A separate word about light: the most common mistake is shooting with your back to a window. The camera sets exposure by the bright background and your face falls into shadow. Turn so the light falls on you.
Step 4. Personal details
The last step before submitting is the details from your document: first name, last name, date of birth, document number.
This is the moment to stop and read everything again. Once confirmed, these details cannot be changed. Not "difficult" and not "through support" — cannot. A typo in a surname, or a day and month swapped in a date of birth, turns into a rejection and sometimes into an account you have to create from scratch.
Check character by character against the document. Especially:
- The transliteration of your name — as written in the document in Latin letters, not the way you usually spell it.
- The date of birth — the format may differ from the one you are used to.
- The document number — with the series, without spaces unless the form asks for them.
Step 5. Waiting
Once submitted, the application goes for review.
The official timeframe is up to 48 hours, and the exchange states outright that in some cases the review takes longer. In practice the automated part passes within minutes; an application reaches a human queue when the automation is unsure about something.
While the review runs there is nothing to do. Submitting again while the previous application is still in progress does not move the queue.
The result arrives by email. And here the previous chapter pays off: the email about your verification result will carry your anti-phishing code. The moment suits a scammer well — you are expecting a message from the exchange and inclined to open it. An email saying "your verification was rejected, confirm your details via this link" without the code is not from the exchange.
What verification unlocks
A completed check opens funding, trading, withdrawals and P2P — that is, everything the account was created for.
Beyond that come levels: after basic verification the exchange offers to raise your limits by additionally confirming your address or your source of income. Each further level means larger daily limits on deposits and withdrawals.
There are deliberately no specific numbers in this chapter. Binance publishes no single public table of limits: they depend on the country, on which legal entity of the exchange serves you, and they change over time. Any figure written here would be wrong for some readers, and in six months wrong for all of them.
You can see your own limits inside the account: Account → Identification. The same page shows your current level and what the next one requires. That is the only source that is definitely about you.
Binance
Opening an account takes a few minutes, and verification usually completes the same day.
Go to BinanceIf you are rejected
A rejection is not a verdict and not an account ban. In most cases it means the review lacked something and the application has to be resubmitted.
What to do, in order:
- Read the reason. The email and the verification page state what exactly did not fit. Resubmitting without reading the reason earns a second rejection for the same cause.
- Fix exactly that. A bad photo — reshoot it in different light. Mismatched details — check them against the document. An unsuitable document — take another from the list available for your country.
- Submit again. Same process, from the first step.
The most common reasons a check does not pass:
| Reason | What to do about it |
|---|---|
| Unreadable photo: glare, blur, a cropped corner | Reshoot in even light, document on a table, camera above |
| Details do not match the document | Check character by character, transliteration especially |
| Expired document | Use a valid one; renew it if the term has run out |
| Document type not supported for your country | Pick another from those offered on the first screen |
| Liveness check failed | Remove glasses and headwear, add light, follow the on-screen instructions |
| Processed photo | Upload the camera original, without filters or cropping |
If rejections repeat and the reason is not obvious, write to exchange support from inside your account, not through a link in an email. And remember the rule from the previous chapter: real support never asks for your password, your anti-phishing code, or codes from your authenticator.
Common mistakes
Picking a country at random. It determines available products, your limits, and the legal entity serving you. The field is not cosmetic.
Typing details without checking them against the document. After confirmation they cannot be changed. A minute of rereading is cheaper than a repeat verification.
Photographing the document in your hands or under a lamp. Glare on the number and a cropped corner are the two most common causes of an "unreadable photo".
Enhancing the photo before uploading. A filter, a crop and auto brightness make the image processed, and processed documents get rejected.
A selfie in glasses or with your back to a window. Both hide your eyes — by reflection in the first case, by shadow in the second.
Funding the account before verification. Money on an account you cannot use is the worst possible place to wait out a review.
Opening a link from the result email. An email without your anti-phishing code is not from the exchange, however much you were expecting it.
What's next
At this point the account is fully ready: the login is protected by a second factor, emails are verified by a code, withdrawals are limited to a whitelist, your identity is confirmed and your limits are open.
The next chapter covers what all of this was for: getting your first money onto the account. We start with P2P — buying crypto directly from other users with an ordinary transfer.
This page contains affiliate links: if you sign up through them, the site earns a commission. It costs you nothing extra.