The two-factor protection from the previous chapter locks the way into your account. But anyone after your money has a route around the login: convincing you to do everything yourself.
An email arrives with the exchange logo. It carries alarm — a suspicious login, a withdrawal freeze, an urgent demand to confirm your account. The link leads to a page indistinguishable from the real one. You enter your password, then the code from your authenticator, and both travel straight to a stranger who types them into the real site that same second.
Two-factor authentication did not help here: you handed it over yourself. This chapter covers two settings that break that scheme from both ends. The anti-phishing code proves an email really came from the exchange. The whitelist stops your money from leaving even when everything else has already gone wrong.
First — the domain
Before setting anything up, there is one habit worth building. It costs nothing and protects you better than half the settings in the Security section.
Check the address bar before you type anything. Not afterwards, not "once it looks odd" — before.

Fake pages live on addresses that resemble the real one: an extra word,
a hyphen, a different zone, a substituted letter. binance-security.com,
binance.support, bınance.com with a Turkish "ı" instead of a Latin "i" —
a quick glance does not tell them apart.
What helps:
- Open the exchange from a bookmark, not a link. Visit the site once, verify the address, save the bookmark, and use only that from then on. A link in an email or messenger goes wherever its author decided.
- Read the end of the domain, not the beginning. In
binance.com.verify-id.netthe real domain isverify-id.net, andbinance.cominside it is merely text. Your browser highlights the meaningful part of the address and dims the rest. - Do not trust the padlock. The padlock means the connection is encrypted, not that the owner is honest. Fake sites have one too — a certificate is free and takes minutes to obtain.
The habit costs seconds and cancels out the value of a convincing email: things never reach the password stage.
The anti-phishing code: a signature that cannot be forged
Checking the domain works once you are on the site. The anti-phishing code works earlier — on the email itself.
It is a short string you invent yourself. Once set, the exchange places it in every email it sends you. A genuine email arrives carrying your code; a fake one does not, because whoever sent it does not know the code.
The logic mirrors a password. Your password proves to the exchange that you are you. The anti-phishing code proves to you that this is the exchange.
Step 1. Open the setting
The section is the same one as in the previous chapter: Account → Security, the Anti-Phishing Code row. On a new account it is empty, and the button offers to set a code.
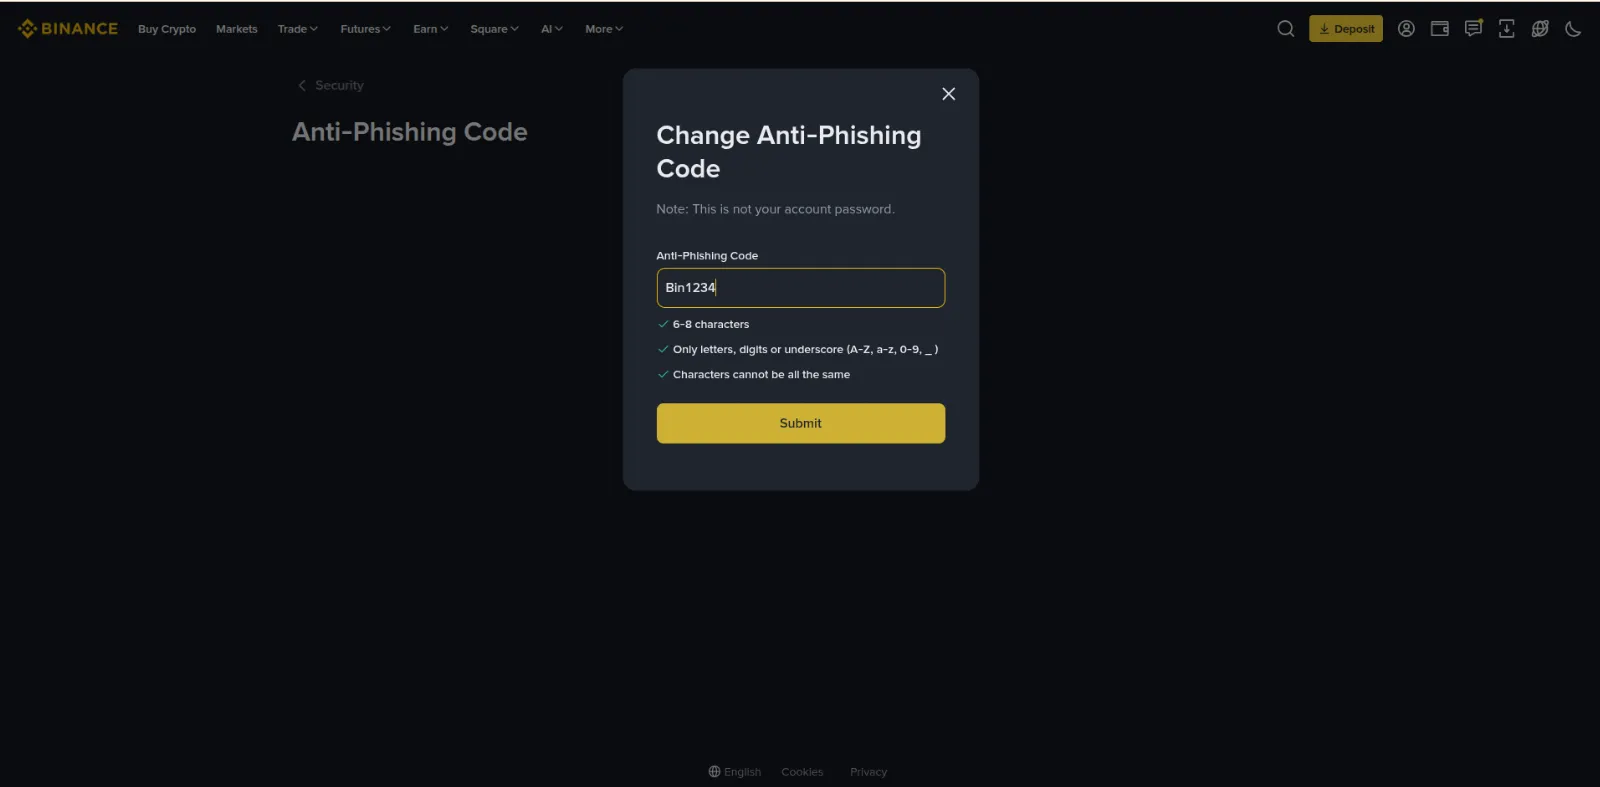
The exchange warns you right away: this is not your account password. The code grants no access at all and serves exactly one purpose — letting you recognise emails. That is why it is never requested at login or at withdrawal.
Step 2. Choose a code
The exchange's rules are relaxed: six to eight characters, letters, digits, underscore, not all characters identical. Two rules of your own are worth adding.
The code must be recognisable at a glance. You will be checking it in a
hurry, in passing, on a phone. x7k2m9 technically qualifies, but a week
later you will not remember whether it is yours or a similar-looking string
from a fake. Something meaningful — a word connected only to you — works
better.
The code must not be guessable. Your name, birth year, or the dog's name straight from your own social media profile is a poor choice. Anyone preparing an email aimed specifically at you will collect that material.
The middle ground works: short, personally recognisable, published nowhere.
Step 3. Confirm the code is in place
Once saved, the exchange shows the code on the settings page — already masked, with only the first characters visible and the rest as asterisks.
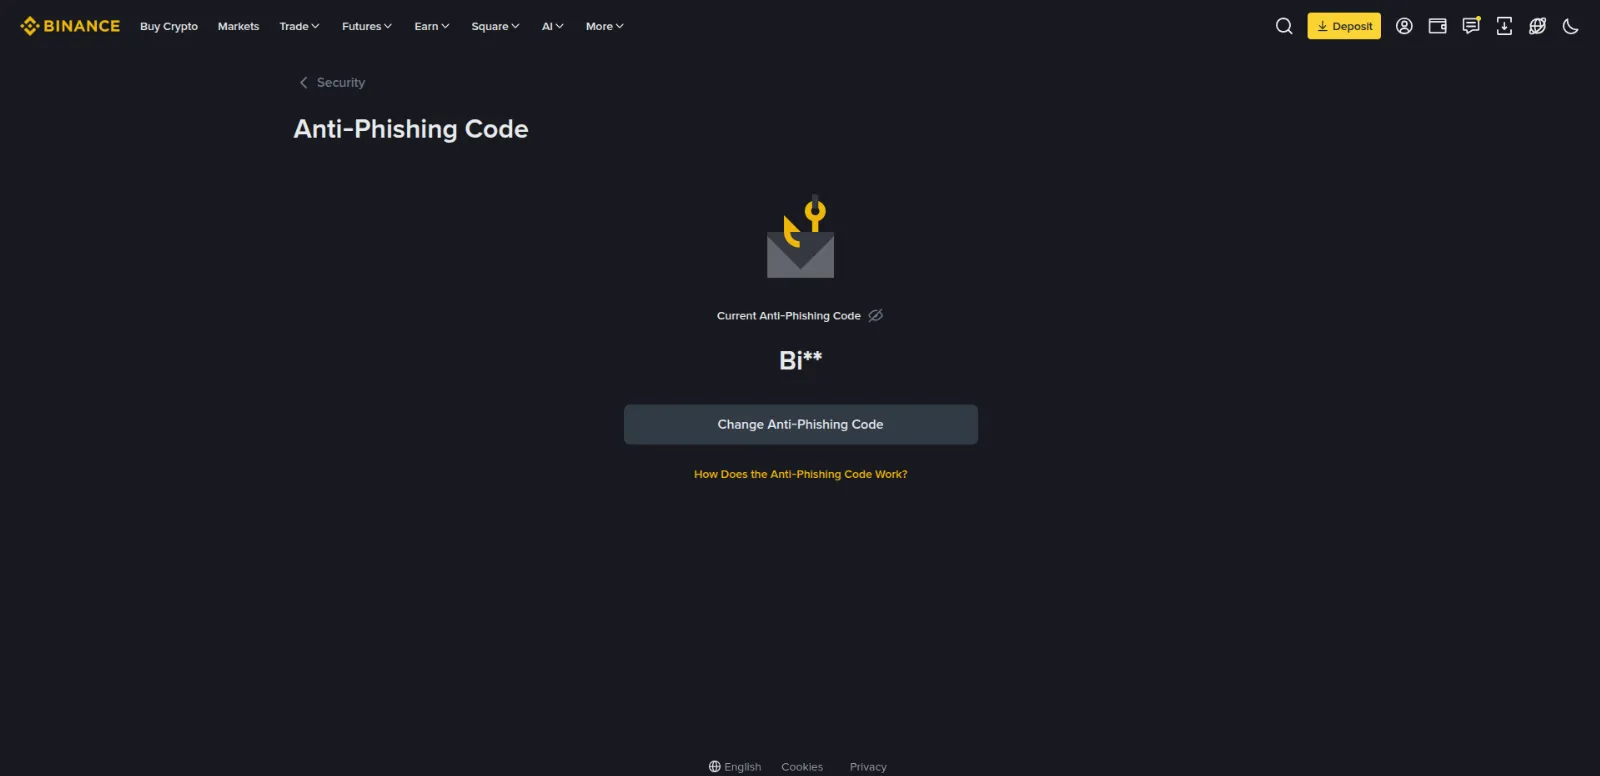
Notice that detail: the exchange hides your code from you. It is the best possible explanation of how to treat it. The code is not decoration on an email but a secret, and anyone who learns it can send you a message that passes your own check.
So it is never dictated to a support chat, forwarded, or published. Real Binance support never asks for the anti-phishing code — it has no need to, since it already knows who it is writing to.
Step 4. Find the code in an email
The next email from the exchange will carry the code. It sits in a corner, usually in the footer next to the phishing reminder.
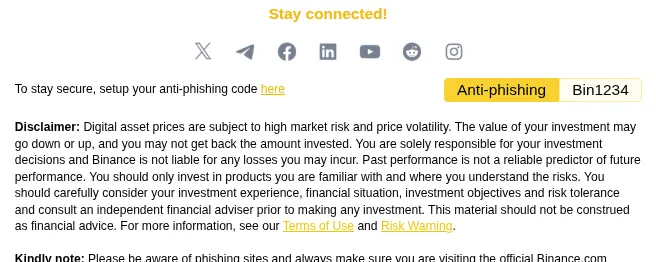
Now you have an unambiguous rule:
An exchange email without your code is not from the exchange. Not "probably a glitch", not "maybe an old message". Such an email gets closed and its links stay unopened. If it says something alarming, open the exchange from your bookmark and look for yourself.
The rule works in reverse too, with one caveat: a code in an email confirms the sender but does not cancel the domain check on its links. A genuine email can still lead to a page you open carelessly.
The withdrawal whitelist
The anti-phishing code protects you from deception. The whitelist protects you from the consequences once deception has worked.
It works like this: you list, in advance, the wallet addresses withdrawals are allowed to reach. While the list is on, funds go only to those addresses. An address that is not on the list will be refused — even if the request came from your computer, with your password, and with a valid authenticator code.
This is the last line. It does not interfere with using your account and is barely noticeable day to day, yet it turns a successful break-in into a failed one: the intruder gets into the account and finds there is nowhere to send anything.
Step 1. Turn the list on
The setting lives in the same Security section, in the Withdrawal block, in the Withdrawal Whitelist row.
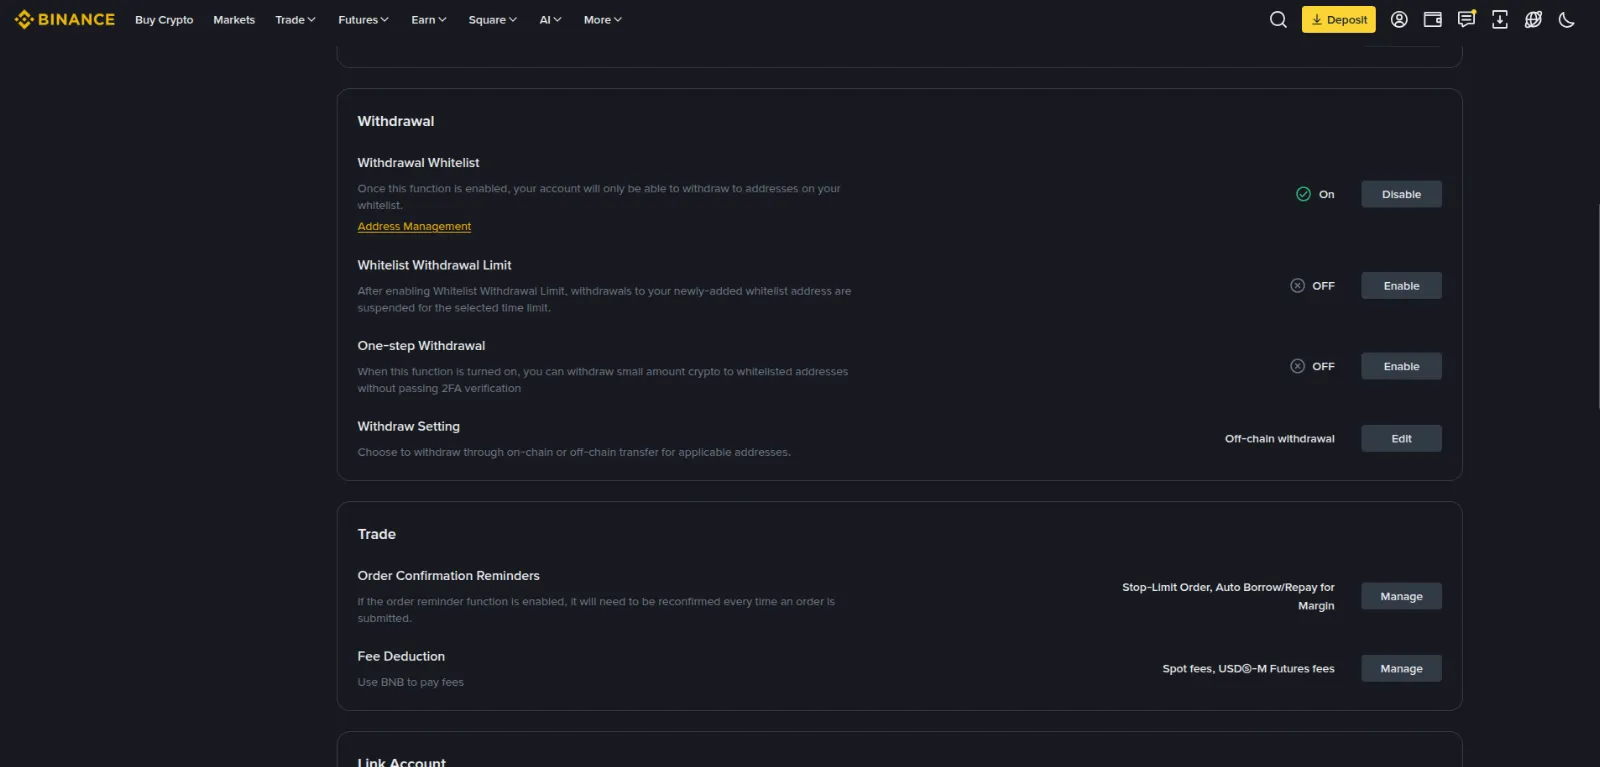
Two neighbouring settings are more useful than they look:
- Whitelist Withdrawal Limit — a delay on withdrawals to a newly added address. A genuinely useful thing: if a stranger adds their wallet to your list, the money does not leave instantly and you have time to notice.
- One-step Withdrawal — withdrawing small amounts to listed addresses without second-factor confirmation. Convenient, but it is a weakening of your protection. Enable it deliberately, or better, leave it off.
Step 2. Add addresses
The Address Management link opens the list of saved addresses. New ones are added from the same place.
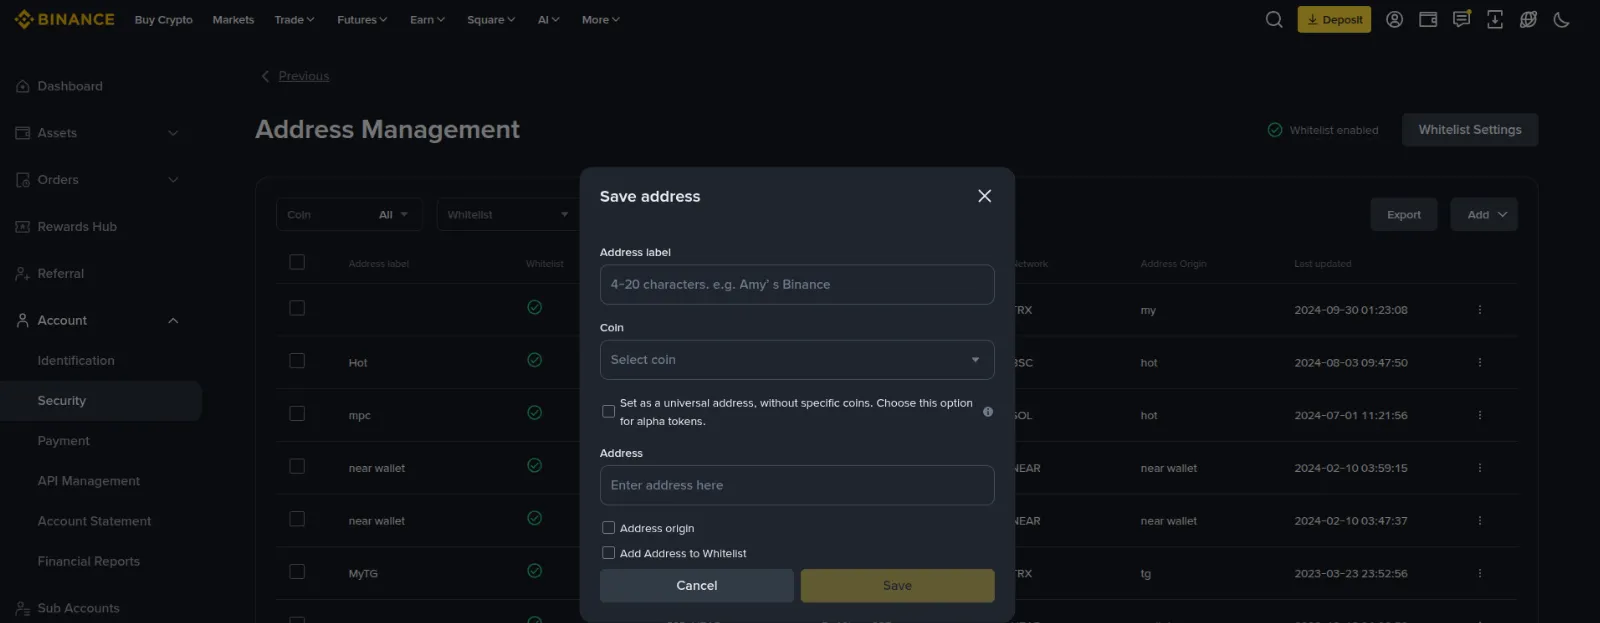
Adding one means filling in four things:
| Field | What to enter |
|---|---|
| Address label | A label that means something to you: "cold wallet", "exchange B". You will pick addresses by it when withdrawing |
| Coin | The coin you are sending. An address can be saved as universal, but naming the coin is more precise |
| Network | The transfer network. The most dangerous field here: a mistake loses the money, and a later chapter is devoted to it |
| Add Address to Whitelist | The very checkbox all of this is for: without it the address is merely saved, not permitted |
Verify the address character by character when adding it, not when withdrawing. There are viruses that swap a wallet address in the clipboard: you copy yours and someone else's is pasted. Adding to the whitelist is the one moment where such a swap can still be caught. Afterwards you will pick the address from a list without looking, trusting the check you did once.
Compare more than the first four characters — the beginning, the end, and at least part of the middle: substituted addresses are chosen so the edges match.
The three settings together
Individually each closes its own gap; together they cover for one another where a single one fails.
| Setting | What it closes | When it saves you |
|---|---|---|
| Two-factor authentication | Login with a stolen password | The password leaked, the phone is still yours |
| Anti-phishing code | Fake emails | The email arrived before you typed anything |
| Whitelist | Withdrawal to someone else's address | Everything else has already failed |
Look at that last row. The whitelist is the only one of the three that works when an intruder is already inside the account. That alone is reason to turn it on, even if the first two feel sufficient.
And the dependency runs the other way too: a whitelist without two-factor authentication is nearly useless. Anyone who logged in with a password alone will calmly open the settings and add their own address to the list. The order from the previous chapter — second factor first — is not accidental.
Check the result in Security Checkup at the top of the Security section: after this chapter there should be noticeably more marks there.
Binance
Opening an account takes a few minutes, and verification usually completes the same day.
Go to BinanceCommon mistakes
Checking the domain after entering your password. By then the password has already been sent. The address bar is read before, not after.
Treating the padlock as proof of a genuine site. The padlock speaks about encryption, not honesty. A certificate for a fake domain is free.
Telling the anti-phishing code to "support". Real support does not ask for it. A request for the code is itself a sign of a fake.
Choosing a code that is easy to guess. A name, a birth year, a pet's name — all of it sits in your own social media, available to whoever is preparing an email aimed at you.
Turning the whitelist on without adding addresses. The setting is on, the list is empty, and the first withdrawal you actually need hits a wall. Addresses are added in advance and unhurried, not at the moment the money is urgently needed.
Adding an address without verifying it. The whitelist locks in whatever address you entered. Enter a substituted one and it becomes the only permitted destination.
Leaving One-step Withdrawal enabled. Small amounts without a second factor is a convenience paid for by those whose "small amount" leaves in dozens of transactions.
What's next
The account is protected: the login is closed by a second factor, emails are verified by a code, withdrawals are limited to your own addresses. What remains is the thing without which the exchange will let you neither trade nor withdraw — proving your identity.
The next chapter covers verification: which documents qualify, how to photograph a document and a selfie, how long the review takes, and what to do if you are rejected.
This page contains affiliate links: if you sign up through them, the site earns a commission. It costs you nothing extra.